Sunday 30 December 2012

Samorol sketches

Finished some more sketches for the Samorol character. At the moment I'm liking number 1, looks nice and agile, and the armour all seems to tie in together nicely, i think the helmet could be combined with number 2 though to improve it, i might also combine a few others parts to get a design i am happy with.

Saturday 29 December 2012

Samorol sketches wip

Moving on now, starting some quick sketches for the Samorol character which are the Emperors finest guards. Granger has to fight one of these in his trial. They are some sort of magic or cursed assassin guards, who can only see through magic Unmer seeing blades, Granger also finds that behind their wolf mask there is nothing left apart from a human skull with a brass plate covering the eyes and nose opening. Ill work on a few more sketches before finalising the design, I'm trying to keep them armoured but, enough for them to move easily so more chain mail than anything.

Granger Unmer armour finished

Calling this one done for now, just need to add some pouches and some small accesories to his belt, again if i have time once the project is finished i will come back to concepts and touch parts up but i need to move on.

Friday 28 December 2012

Granger development 2

Blocking in the colours and details for Granger's armour. I've also gone for the head variant 1 because i think it seems to fit with the rest of the body, I've also changed his expression so he looks a bit more pissed off and meaner looking, things could change though, any of the other head concepts could be easily swapped in.

Thursday 27 December 2012

Granger development

Just having a go at making Granger looking all messed up after he dived into the poisonous water. The book describes his face covered in sharkskin, dry cracked and grey, and red painful looking eyes with a bald scalp. So here are just a few small variations, not sure which one ill will go with though... I'm thinking number 2 at the moment, i like the idea for number 1 with odd bits of hair still remaining on the scalp.. but I'm not sure if it looks a bit odd. And number 3 might be a bit over the top with the dry skin, but I'm not sure....

Unmer armour wip 3


 Here is the finished concept for the armour, pretty happy with it, looks quite protective and mechanical with cogs and belts on the arms and legs, these are there to help the user move and have increased strength. Below I've started to block in the armour on the Granger character, next i need to transform the characters face and start rendering and detailing the armour.


Wednesday 26 December 2012

Unmer armour wip 2

Some more progress on the armour, every thing's blocked in now, even the back view (Black and white, no need for colour) Just need to add some details and polish a few bits up then ill need to draw this armour on Granger, which will be interesting because i also need to transform the character to look like hes been exposed to the briny waters (Brine sea water turns people in 'Sharkskin' when exposed for long enough, sharkskin people can only live underwater, or they will die in the sun) The water makes the skin become grey, dry and cracked once in sunlight.

Monday 24 December 2012

Unmer armour wip 1

I chosen thumbnail 5 to develop further, Ive also taken a few other ideas from the other thumbnails and merged them with this concept, I'm working my way through the armour design now refining and adding more suitable parts to the armour to make it more believable, I'm happy with how its looking so far, starting to look a bit more mechanical now which is what i wanted. Ive gone with the brown, bronze colour scheme like the old brass diving gear, think it fits the overall theme of the book pretty well.

Sunday 23 December 2012

Unmer Armour ideas

Here are a few armour concepts i came up with. This armour is a magic Unmer artifact in the book, its called 'Mechanical nerve armour' its something that i imagine give the wearer increased strength as well as being protected by metal plates of armour. In the book it describes the armour to whir softly when moving and the small metal plates move and chatter, like its almost moving itself, or its aiding the wearer to help movement. So i wanted these armour concepts to look kind of medieval with mechanical looking parts, while trying to keep it looking functional. The only problem with this, i think that some of the armour concepts turned out looking a bit sci-fi  and more futuristic. I'm still not 100% sold on any of the concepts so i might have to bash a few ideas together and see how it looks on the character with colour. I think the ideas on the bottom row turned out better though.

Saturday 22 December 2012

Granger Final concept

Calling this character done for now, ill have to wait until i come back to uni for feedback if things need changing.. which I'm sure there are, but ill move on now as there's lots that needs to be done.

Granger development 3

More progress on Granger, began working on the back view now, hope to finish the concept soon so i can move onto designing some armour for him.

Wednesday 19 December 2012

Granger development 2

Starting to work on the final design for Granger, so i drew out a quick back view and started blocking in colours and some definition of where detail will be. Just need to put a few hours into it now and paint it up. The process for this character is going much quicker at the moment though which is good, characters with more clothing takes much longer, but as this character was either going to wearing trousers or a piece of material its much quicker.

Tuesday 18 December 2012

Granger development

Some  character development for Granger, a few full body black and white variations. Think the character definitely looks better with the torn trousers, and the pose where hes holding his ribs, it adds some story to the character. Next i then painted up some colour studies of different faces, again i much prefer number one, it just suits the character more in my mind as he doesn't look that beefy but he looks tough. Ill now go onto develop the character until i have the final character design.

Monday 17 December 2012

Granger initial sketches

Here are a few quick sketches, just throwing some initial ideas and possibly body shapes out for the character. Although i quite like number 3, looks pretty tough and ugly,  i just think it he looks a little big for the character and the pose needs changing too. At the moment I'm more happy with sketch 2 because i think he fits the build for the character better but also the pose is much nicer, the characters been pretty beaten so this pose represents this, cut and bruised holding his stomach like he's hurt. I might develop 2 and 3 more a little further before choosing one i like, then develop that design further.

Mood boards


just a little progress update on what Ive been doing, just got all the mood boards, references that ill need out the way.

Granger referances

Moving back onto character designs now, here i have gathered some images to get the ball rolling for a character called Granger, he is one of the main characters in the book, although he is in most of the book he isn't described that much, i think the book really leaves it up to the reader to give an image of what he looks like. The only descriptions i found were that hes fairly tall, and lean in appearance, not the most well built of men but has over sized joints, "ugly" looking face and looks generally quite battered. So i researched into a few actors and also grabbed some concept art for a character from Dishonoured mainly because i imagined Granger to have the same kind of broad chin, quite ugly and beat up face with the short cap of hair. I'm designing this character for a scene in the book where he has just been held in prison, beaten up and now heading into a arena or execution so hes not going to be in the best of shape, i don't think hes even wearing too much clothing as he pretends to hang himself with his own clothing earlier so he would not have been given any clothes back, so maybe hes wearing a rag around his waist or just trousers that have been given to him for the execution.

Saturday 8 December 2012

Final scene wip 6


This is pretty much the final image i think now, might just tweak a few things but apart from that i need to be moving ahead with the project. Ive done two slight variations one with a gem lantern by the characters feet, the gem lanterns in the book are a light source that cannot be turned off, the lantern has a shutter mechanism to simply block the light. Not sure which one i like the most, need to get some feedback if it looks better without the lantern or not, im thinking adding it in might be overdoing it, ill have to come back with a fresh view and see what i think...

Wednesday 5 December 2012

Final scene wip 5

Fire?? i think it adds to the scene a little and gives it a bit more depth and action going on... makes it a little more interesting i think, plus i can do some nice lighting around everywhere now!

Monday 3 December 2012

Thursday 29 November 2012

Final Scene wip3

Some more progress on the scene, trying to detail everything out, thinking its looking a little boring at the moment need to add some crew aboard, some fires and water crashing up the side of the boat, just not really sure where i want all this going on but it definitely needs to be added to liven the scene up.

Monday 26 November 2012

Final scene wip 2

Some progress with the final painting adding some colours, pretty liking the direction so far.

Tuesday 20 November 2012

Guest Talk- Shaun Mooney and final painting progress


Guest Talk-Shaun Mooney

For today's lesson at Futureworks we had a guest lecture from a guy called Shaun Mooney who is a professional concept artist working within the games industry who's worked for TT and Atomhawk in the past. He was brought in to talk to us about himself, what he’s done since he finished university on his games design course at Preston and what he’s done to make a professional career; he also went through his work process which I will talk about after. Firstly he talked about himself then he began to show his work, he sectioned his work up into 3 categories design, illustrations and mood's he talked about each of these areas in depth such as design is purely the process of designing something weather that might be a character, weapon or a environment, something that’s done fairly quick to a presentable state which shows different design variations and ideas. Illustrations are something where the design has already been finalised and its just to make a nice image to show textures and the form of the concept so this can be passed on to a 3d artist to make your concept ready for the game engine. Finally is mood, where quick ideas and concepts are made to get a 'mood' across for an environment or area of a game, this could be colour or black and white as long as they get the mood across that you intended.

Next Shaun went through a tutorial and shown his process of creating concepts to final rendered designs with his usual workflow which he applies to most areas of concept art. For this tutorial he shown us how he designs weapons, the first step is throwing out several black thumbnail silhouettes which are done quickly with a hard brush adding and erasing parts until he is happy with the design, below are a few weapon thumbnails i drawn up myself which I may further develop in my free time.


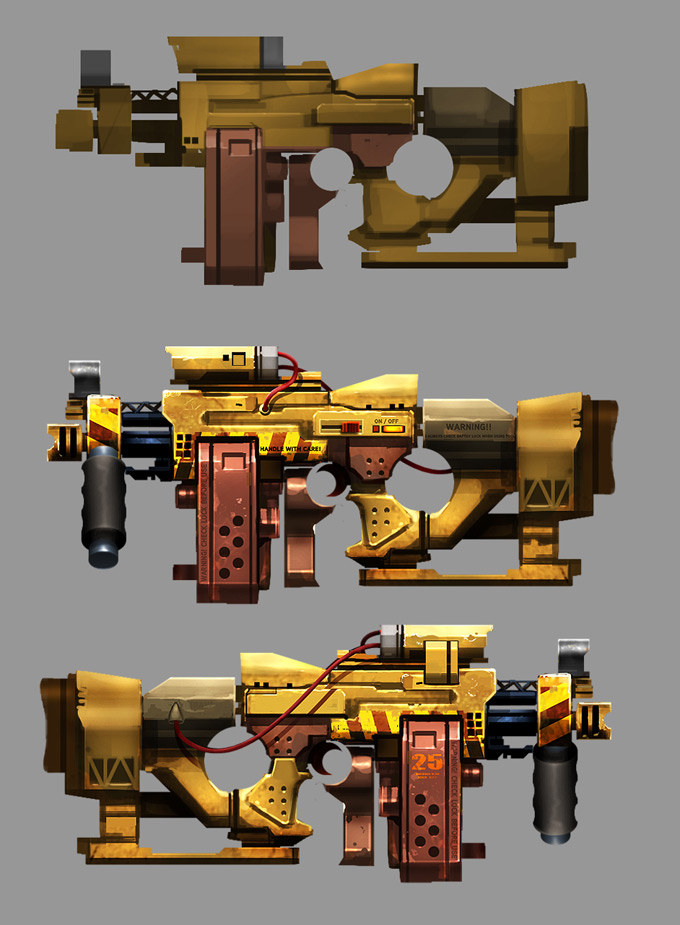
The next step was to then choose a design that is preferred to work up to final concept, below is an image of his basic process after the thumbnail selection, what is great with this way of working is that it is so fast you could knock out a few of these in a day which the art lead could take a look at and even approve the concept to final or 3d. Mooney also shown us tons of shortcuts and tricks in Photoshop which we could use to improve our work flow and speed which was a big bonus and definitely helped to get the idea across that speed is key in games industry, which is what he drilled into us in the lecture, speed is everything to get ideas across quickly and efficiently, he even recommended the use of photographs in concepts, kind of like a matte painting using these images to aid you in your designs, to paint over them and get the idea across quickly which was the best and most valuable lesson of the day. It was a great lecture and i learnt a ton! Shaun Mooney is a great artist, what he’s doing know is where i aspire to be, to get a career in the games industry, hopefully one day the time and effort i put into my work will pay of.
Here a link to Shaun’s portfolio for more of his work:
http://smooneyconceptart.blogspot.co.uk/

(Image by Shaun Mooney)


Painting Progress

And here is a little progress on the final painting, I’ve fleshed a few things out a bit more on my break at uni so not had much time but thought id post it anyway, I’ve also chopped the dragons head out of my previous illustration and re-jigged it and opened it mouth to get an idea of how it’s going to look, the rest of the scene needs to be done then and add some colour.


Monday 19 November 2012

Final painted scene (wip1)

Finally Ive chosen to work on this thumbnail idea, Ive started to develop and add some detail in the foreground already. Although this isn't to difficult i think it will still have a good outcome and is more achievable than what i was aiming for before with crazy perspective and wide field of view, instead Ive gone with a much taller canvas. This is what i have so far i want to detail whats there at the moment such as the boat and the dragon and then start adding in more detail like small fires other characters in the mid-ground running for cover, some of the crew manning the cannons and aiming them at the dragon so i think there will be enough detail and story information to tell whats going on and whats going to happen, there's a lot of work that needs to be done though so i just need to crack on.

More thumbs..


 This image is a render taken from 3ds max using the biped features to create a character and a base for the dragon and using the 3d model of the boat i had already made. Renders were then taken using a camera to get the position and the field of view, at first i was really happy with the outcome but coming back to it i don't like how things are too over stretched because of the intense field of view camera, i prefer a much more simple approach looking back at my older thumbnails so i began to do a few more sketches as i wasn't completely satisfied.
Here is another quick idea of the dragon clambering onto the side of the boat, i like the pose of the character because most of him will be visible which is what i want but i wouldn't like the overall view of the scene if i developed it. 

Here is one more thumbnail i created from a 3d render, so far this is one of my favourite because you can really see the size scale of the dragon clambering over the boat, i could draw the fleeing crew running for cover on the deck below witch would add to the action and show a sense of scale.

More quick thumbnail ideas


Forgot to post a few more quick thumbnail idea (might be a little hard to see) basically im just trying to figure out how im going to be able to get both the dragon and the character seen well, while making the dragon looking much more powerfull and large. At the moment i still dont think i can get this across properly so i will need to try different ideas to see if i can find something better to start with.

Monday 12 November 2012

Maskelyne and dragon final scene idea 1

Its time for me to move and start the final scene where Maskelyne battles the dragon on his boat.
Here's my first initial idea of the dragon landing on the control area at the back of the boat, crashing through parts of the boat, and in the foreground Maskelyne with his blunderbuss ready to fire at the dragon. I want to do a few more thumbnail ideas as I'm not entirely sure on this idea, i might do a more wide screen landscape or portrait view to show of the scene more, showing the crew running in fear, and possibly the dragon much bigger to really show how powerful it looks compared to Maskelyne.

'The Mistress' Final.. i think!

I think this is the final concept now for the boat design, i went in and done some more close up shots of the bathysphere that gets lowered deep into the see by the crane winch, i wanted it to look quite rusty and weathered because of the briny sea water corroding the metal. There is also a drawing of the rotatable cannons which can be found on the boats deck, these can be rotated 360 degrees and move up and down to aim at targets. Ive also drawn a side and top orthographic view so its clear to see the layout and more areas of the boat such as the propellers and the rear steam chimney without perspective.

Saturday 10 November 2012

'The Mistress' wip 4

Pretty much final concept for the boat now, I've decided to get rid of the back perspective it doesn't seem that informative. What i plan to do instead is do a few orthographic drawings of the boat to accompany the concept, ill also do a close up of the bathysphere and possibly the rotatable cannons on deck. For some reason the 3ds max file isn't opening on my laptop, it might be because i saved it in class with a newer version so ill have to wait untill Monday till i can take some more renders and work over those to finish the piece off.

Friday 9 November 2012

'The Mistress' wip 3

Some more progress on the boat concept, finally getting there now on the front perspective.

'The Mistress' wip 2

Here's a bit more progress on the boat concept, still need to add more detail and add some colour and textures onto the rear control area and the bathysphere.

Wednesday 7 November 2012

'The Mistress' wip 1

Not had much time to work on this, hopefully ill get it finished by the end of the week. Here's my first pass anyway just testing out some colour schemes and textures. Quite happy with the overall rusty look on the hull of the ship, although i see Maskelyne as quite a posh looking character, how he is described on this boat is that he looks and wears exactly the same as his crew with battered clothing so i don't imagine this boat as a royal looking ship but something that serves its purpose and has done in the past well. So hopefully ill be updating the progress with this soon, i want to also do some different views, like orthographic drawings and close up detail shots.

Monday 5 November 2012

'The Mistress' 3D model

Here's the basic 3d model i made in class time today. I took inspiration and referenced images from the mood board and took ideas from the thumbnails. I'm pretty happy with the overall design of the boat it just needs a lot of texture work and painting to add in more detail. I also want the the boat to look quite roughed up, i imagine its not so looked after but purely just for gathering treasure deep out into the sea. Although i do want it to look like it was quite a nice ship once it was made but it has been battered from the multiple adventures its been through. Next i will start adding colour, adding textures and detail.